You can transfer photos from Android phone to computer in several ways. Find out how to transfer images to your computer via Wi-Fi, Bluetooth and cloud storage. We also show you how to send photos using a USB cable.
Check out all the options below and choose the method that works best for you.
1. How to transfer photo from cell phone to PC via Wi-Fi
Wi-Fi transfer is one of the most convenient ways to send files from one device to another. For this, it is necessary that the computer and the smartphone are connected to the same Wi-Fi network.
You also need to install an application on your cell phone to transfer the photos. Below, we list two options: with the native Windows 10 Your Phone app and with the Send Anywhere app, compatible with Windows 10, 8 and 7.
Don't know what your Windows version is? Find out in our guide How to see PC settings and get full specs.
Your Phone (Windows 10)
The advantage of using the Your Phone app is that it is already installed on Windows 10 and automatically syncs, without links or codes.
In addition to accessing your cell phone's photos, the program also allows you to view SMS messages, notifications and even make and receive calls from your computer. Some Samsung models even guarantee remote access to apps through the app.
Before following the steps below, install the app Your phone on your smartphone.
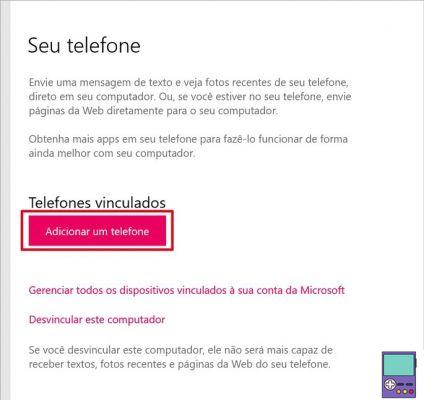
1. On your computer, type the word phone in the search field on the toolbar. Among the options that open, choose link your phone;
2. The Your Phone settings window will open. Now go to the button add a phone;
3. Now the system will open the Your Phone program. Inform if your device is Android or iPhone and click Continue;
4. On the next screen, add your phone number, enter the email address linked to your Microsoft account and confirm in Continue;
5. Take your smartphone and first make sure it's connected to the same Wi-Fi network as your PC. To do this, drag your finger from the top to the bottom of the screen to access the quick menu items. Drag your finger once more to see the network name;
6. Now open the Your Phone app, which may be named Your Phone Companion. Follow the directions by first tapping Introduction and on the next screen, Continue;
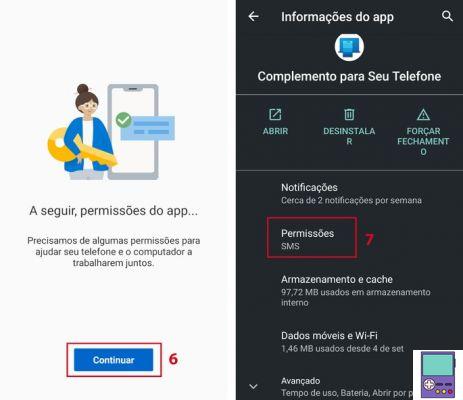
7. You will be taken to the app settings on your device. In order for everything to work as intended, you will need to enable the following permissions for the application:
- Photos
- SMS
- Contact us
Touch Got it hey go on All rights reserved. to give the necessary concessions;
8. A message will be sent to your mobile phone asking for permission to connect to the Your Phone app on your PC. tap on Allow;
9. Back on your computer, open the Your Phone app. In the side menu, go to Photos. Wait for the synchronization to complete and all images available on your phone will be displayed.

It is possible to open, copy, save as JPG and share in other applications.
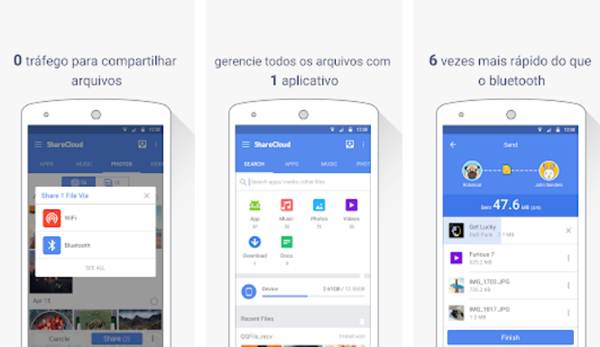
Com o app Send Anywhere
Send Anywhere is a free app that lets you send different types of files up to 10 GB at a time via Wi-Fi. Among them, of course, the photos. The manufacturer ensures that in the direct transfer process, which we show below, the content is not stored on the servers.
It is necessary to install the app on your Android and also on your computer. In addition, both devices must be connected to the same Wi-Fi network.
1. Open Send Anywhere on your mobile and tap the tab Photos to access the images available on the device;
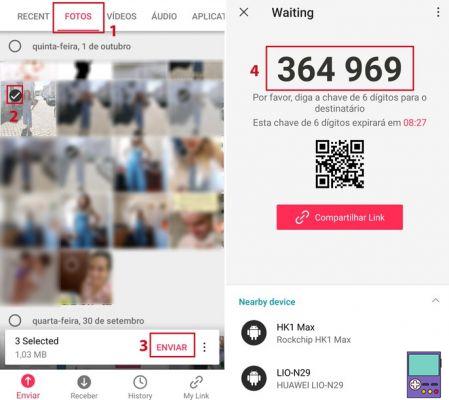
2. Tap on the photos you want to transfer to the PC. A check mark will appear inside the circle of the selected image;
3. Once all the desired images have been selected, tap Send;
4. Note that a 6-digit code will appear on the cell phone screen;
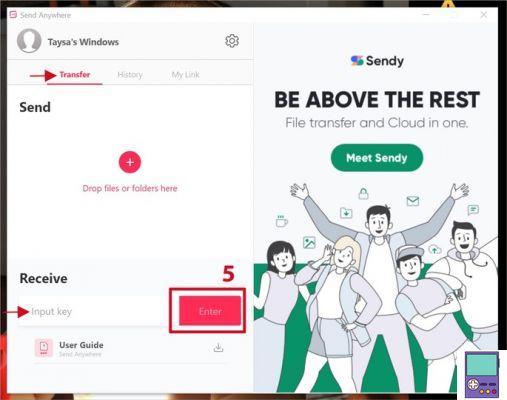
5. Now, open the Send Anywhere program on the computer. on the tab Transfer, enter the number in the box where it says Input key and confirm in Enter;
6. Uploaded photos will be listed. click in Download For download;
By default, images are downloaded to your computer's usual Downloads folder.
If you want to change, in the PC program, tap the gear icon (⚙) and click File transfer. in the section Download Path, click on a folder icon and select the location where you should download the files transferred with the program.
2. How to transfer photo from cell phone to PC via Bluetooth
Most newer notebooks have the option of transferring content via Bluetooth. Although it can be a slower process, it is a good option when you don't have Wi-Fi in the environment or a USB cable available.
First, let's enable Bluetooth on the phone:
1. open the app Setting and go on Connected devices;
2. so tap Connection Preferences;
3. Now, choose Bluetooth;
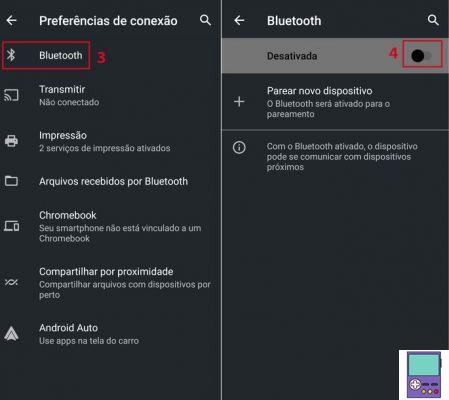
4. Then activate the switch at the top of the screen to turn on this transfer mode.
Now, we must activate Bluetooth on the computer:
1. In the Windows search box, on the taskbar, type Bluetooth. In the search result, click Bluetooth and other device settings;
2. In the window that opens, activate the switch next to the item Bluetooth;
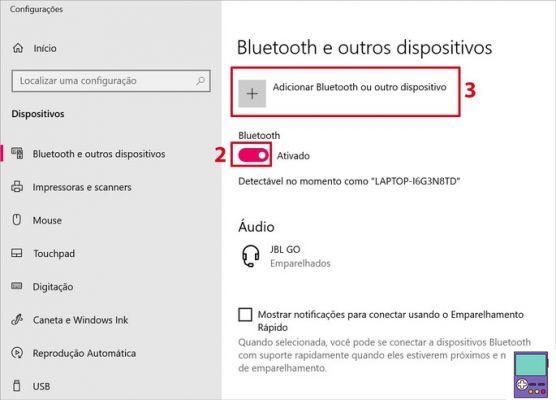
3. Now is the time to pair the devices. click in Add Bluetooth and other devices;
4. In the Add a device window, click Bluetooth;
5. The PC will search for nearby Bluetooth enabled devices. Remember that the cell phone needs to have the screen unlocked to be found;
6. In the displayed list, click on the name of your cell phone;
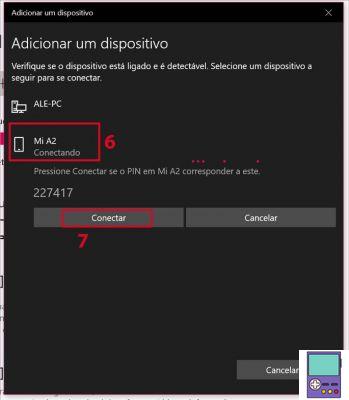
7. now go to Connect;
8. A message will be received on your smartphone. Check that the code displayed on the screen is the same as on the computer and check the box next to Allow access to your contacts (...). Finish the process in Pair;
9. When the process is finished, a message will be displayed indicating that the pairing was successful. In addition, your smartphone's name is now displayed in the Bluetooth settings window in the Other devices.
Finally, let's send the photos from the cell phone to the PC:
1. In the right corner of the Bluetooth and other devices window, click Send or receive files via Bluetooth;
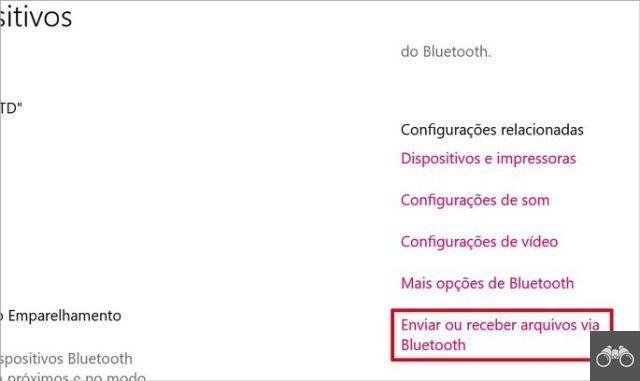
2. In the Bluetooth File Transfer window, choose receive files;
3. Now, on mobile, open the app Photos. Touch and hold for a few seconds one of the photos you want to share. The image will be selected and the others will have checkboxes. Tap on the ones you want to transfer to the PC;
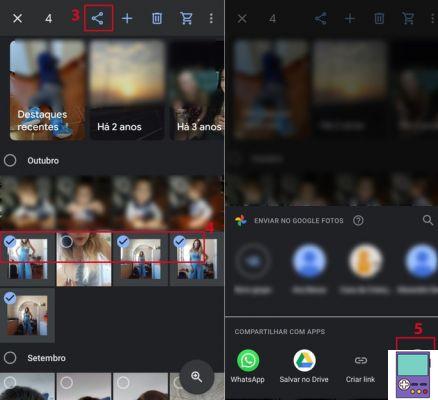
4. Tap on the share icon at the top of the screen;
5. Now, in the Share with app section, tap More and then in Bluetooth.
6. Then go to the computer name and wait for the transfer to complete.
7. The process will be displayed in Bluetooth File Transfer. In it, you can even select the folder where the file goes. Finish the process in Conclude.
How to transfer photo from mobile to PC via cloud
Another way to transfer photos from your cell phone to your computer wirelessly is through the cloud. The most practical way for Android users is through the Photos app. The program automatically backs up the gallery images and lets you access them on your PC from your browser.
First, make sure Photos auto-backup is turned on. It is recommended that the process be done with Wi-Fi turned on, to avoid excessive consumption of your data package.
1. Open the Google Photos app and tap on your profile picture at the top of the screen;
2. Then go to enable backup;
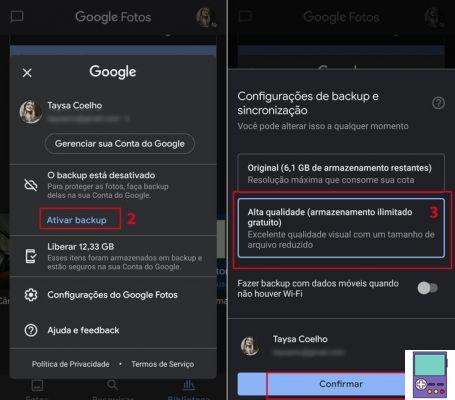
3. Set whether you want the photos to be backed up in full resolution or in high quality;
4. Go in Confirm.
To access content on your computer, open your preferred browser and go to the Google Photos website. If you are not logged into your Google account, you will need to enter your login details.
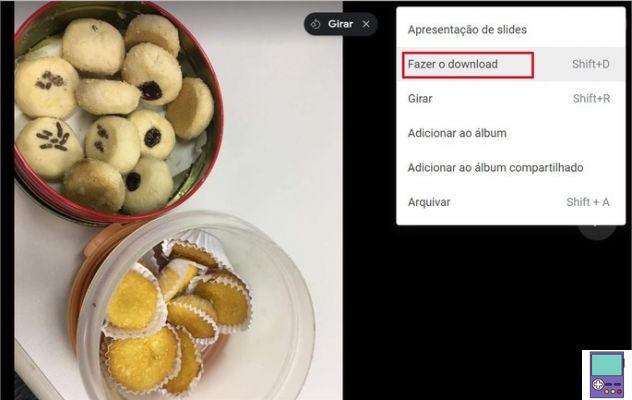
Open the photo you want to download on your PC and click on the three dots icon in the upper right corner. In the menu that opens, click Download.
How to transfer photo from cell phone to PC via USB
To carry out the following steps, it is necessary to have a USB cable compatible with the charging port of your cell phone. You can use the USB cable that makes up the cell phone charger, if it is of the removable type.
1. Plug the cable into the micro USB or USB Type-C port of the cell phone. Then, connect it to a USB port on the computer, thus connecting the two devices;
2. Then drag your finger from the top to the bottom of the phone screen to access the Android quick access menu. Check if the smartphone indicates that the cable is connected and tap on the option;
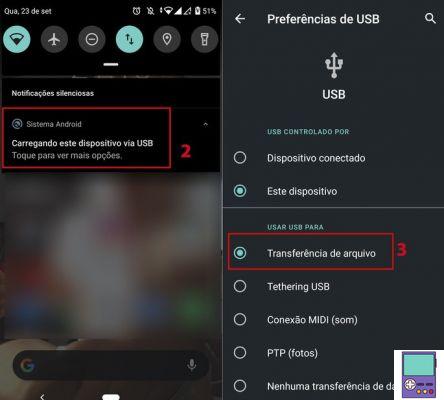
3. Select option File transfer, if not activated. The item may appear as MTP, an acronym for Media Transfer Protocol (media transfer protocol, in free translation);
4. On your computer, open the folder This computer ou My computer and search for your mobile phone name in the Devices and Units section;
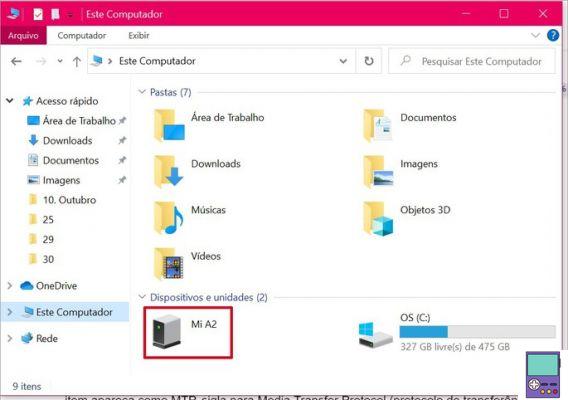
5. Photos can be found in the DCIM, Pictures and Downloads folders. Or inside the applications folder, such as WhatsApp or image editors, such as Snapseed, for example;
6. If you want to save a photo individually, open it and click on the three dot icon in the right corner. In the menu that opens, choose Save as and store in the place of your choice;
7. To scroll through several photos at the same time, click on one of the images and then press the Ctrl. Keep the key pressed while clicking on the other photos you want to save;
8. Then release the key Ctrl and right-click on one of the selected items and go to Copy. Then, open the folder in which you want to save the files and click again with the right mouse button on a blank space. Now, choose Necklace.
recommends:
- How to use cell phone as PC webcam via Wi-Fi or USB cable
- How to Download Files from Google Drive on PC, Android and iOS
- Best Photo Viewers to Replace Windows App