by Team AllYourVideogames | Jul 29, 2022 | Technology |
If you've changed your operating system and you still don't know how to make a screen print on mac, you're in the right place. Surely, you've already needed to take a screenshot of something, whether on your cell phone or computer and maybe you still don't know how to take it print screen no Mac.
There are a variety of options for taking screen prints on Apple's MacBook through command keys. Check it out below:
5 Alternatives on How to Take a Screenshot on Mac
1. Full screen capture automatically saved to desktop
Press the hotkeys “Shift + Command + 3” if you want to capture the entire screen. In this way, screenshots are automatically saved to the table (desktop).

As soon as you print, a thumbnail will appear in the corner of the screen. You can click on it to edit the photo or wait a few seconds for it to be saved to the table.
2. Capture a specific part of the screen automatically saved on the table
The keys "Shift + Command + 4" pressed simultaneously makes the mouse cursor become a kind of target. It means you can select exactly the part of the screen you want to capture.
As soon as you release the cursor, it captures the selected region, as in the previous command it will be saved directly to the table. Likewise, it will show floating thumbnail of the print, giving you the option to edit it before it is saved.

These two methods generate files that go directly to the table. However, the print screen is saved in PNG format, which has the disadvantage of taking up more space and this could get in the way if the purpose was to send it as an email, for example.
To solve this issue, just make a simple configuration: Go to the Finder menu and search for “Terminal”. When it opens, type the following command and press “Enter”:
defaults write com.apple.screencapture type jpg
In this way, screenshots will be saved in JPG format, which takes up less space.
3. Full screen capture saved to clipboard
To take a full screen capture that is saved on the clipboard, just use the command “Command + Control + Shift + 3”:
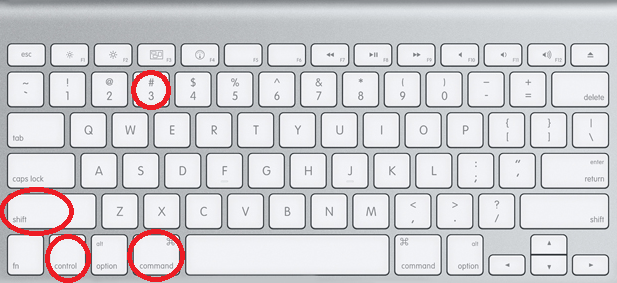
The capture is of the entire screen and in this way, instead of generating a file that goes straight to the table, it saves the captured image on the clipboard, giving you the freedom to paste it directly wherever you want. This image is already saved in JPG format.
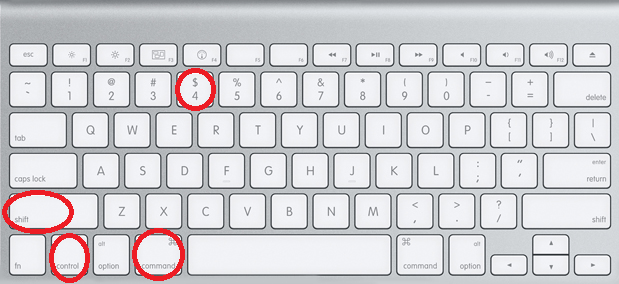
4. Capture specific part of screen saved to clipboard
The hotkey “Command + Control + Shift + 4” allows you to select only a desired part to be captured, through the cursor which will be in a target format as mentioned before. The difference is that the file will be saved on the clipboard.
5. Capture a window
If you want to capture a certain window it is also possible. Following the same pattern as the paths already presented, we have two options:
- Screenshot of a specific window that will be saved on the desktop;
- Screenshot of a specific window that will be saved to the clipboard.
Screenshot of a specific window that will be saved to the desktop
You can capture a certain window. Just use the key combination “Command + Shift + 4 + Spacebar + Mouse Click”.
The cursor icon will change to a camera format. Then the window you hover over will be highlighted. Click to capture. If you wish, you can even delete the window shadow. Just hold down the “Option” key while clicking.
A thumbnail will appear in the corner of the screen, just like in the other ways. The print will be saved in PNG format on the table, unless you have already configured it in Terminal, as we have already taught.
Screenshot of a specific window that will be saved to the clipboard
The only difference is that the print will be saved to the clipboard. For that use “Command + Control + Shift + 4 + Spacebar + Mouse Click” and then the screenshot will be saved in the clipboard.
You can also enjoy another tool on your Mac: use the universal clipboard, which allows the user to paste the screenshot on another Apple device, which can be useful according to your goals.
Learn More: Screen Recorder: 15 Tools to Capture Your Phone or PC Screen
The list of commands may seem long, but you don't need to know them all. Just choose the method that best suits your needs.
However, if you want to have all the possibilities at hand, a tip is to make a “colinha” and leave it accessible so that you can consult when necessary.