by Team AllYourVideogames | Jan 12, 2022 | Technology | 0
Knowing how to take a screenshot on your laptop or computer can be quite different than taking a screenshot on your smartphone or other mobile device. There are several ways to do this, so we've separated the main ways and explained how to take a screenshot on your laptop or PC, so you can choose the best way possible.
In case you don't know what a print is, we'll explain the definition before we show you how to take a print on your notebook. Also known as Print Screen, the name can be translated as “Screenshot”. Thus, we can say that a print is like a photo of the screen of your notebook, computer, cell phone or other device you are using.
However, you don't need to point a camera at the screen, as the device itself allows you to take the photo directly and in better quality. In addition, you can make some edits to the print and save as you see fit.
Thus, there are different ways of taking the print on the notebook and on the computer, below we teach the step-by-step how to carry out the process in the best ways.
Learn more: What is direct mail? How to do it in Word and more
How to take print on laptop
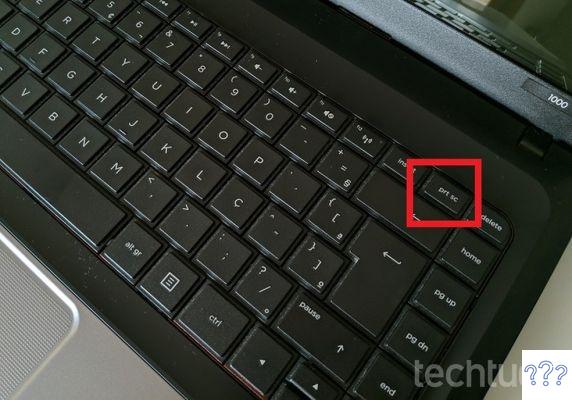
Image: TechTudo
Starting our explanation, we will first show you how to take a screenshot on the notebook, and then move on to the PC. So, with your notebook open on the page you want to “print”, perform the step-by-step described below:
Step 1. Look for the “Prt Sc” key on your notebook keyboard. It is normally located on top of keyboards, and you need to use the key to take a screenshot. The process works as a kind of “copy and paste”.
Step 2. After locating the “Prt Sc”, press the CTRL key at the same time as the print key. With this, half of the work will be done and the computer has already recorded the desired screenshot. If you haven't noticed anything different, you can rest assured, this process doesn't visibly happen in this part.
Step 3. Still on your notebook, open the Paint program that is already installed on all computers. In case you don't know, it's a program that serves for simple drawing and editing. To open Paint, just click the Windows button or click on the start menu, in the series of available options, scroll down to the letter “P” or type the name of the program to find it.
Step 4. To insert your screenshot in Paint, just click on “CTRL + V”, so the print will appear on the screen at the point of being saved, in case you don't want to make any edits. If you want, just make the desired changes and finish the process normally as described below.
Step 5. Now, you just need to save your screenshot, and for that, go to the upper left corner of Paint and click on the “File” option. After that, go to "Save As" and choose the desired format to save the print.
Step 6. Because it is an image, the most suitable format is JPEG, and after selecting this option, a window where you will choose the location to save the image will open. Set the image name and click “Save”.
Another way to save the print, if you do not want to select the folder where it will be saved or define the name of the image, is to click on “Windows + Prt Sc” in the window you want to save. That way, the print will be automatically saved in the default “Images” folder that already exists on your notebook. With that, you don't need another program to carry out the process, like Paint.
Learn more: How to enter Hotmail email? 7 simple steps
How to take screenshot on PC
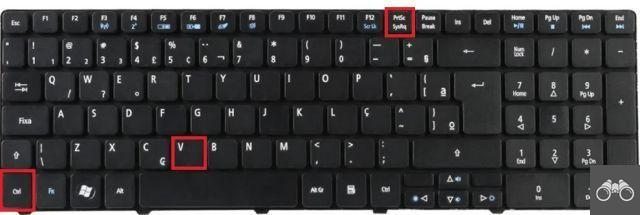
Image: Free Application
Now that you know how to take a screenshot on your laptop, we are going to teach you how to do the same on your computer in several different ways. It is worth noting that the operating system we are using for this explanation is Windows 10 version 21H1. For other versions the process may vary a little, but probably the difference will not be that much.
Tecla Print Screen
The first way we are going to teach you is basically the same as described in how to take a screenshot on the notebook. You will click on the “Prt Sc” key on your keyboard to take the screen print and automatically copy it, being stored in the “CTRL + V” function. Typically, this key is positioned in the upper-right corner of computer keyboards.
In any editing program you have on your computer, click “CTRL + V” or right-click and click “Paste” to move the print into the program. Here, we are using the paint program as a base. Then, if you don't want to edit, just save the image normally by going to "File", then "Save As" and choosing the location where the image will be stored and the file name. Another option is to use the shortcut “CTRL + S” and open the same screen described above, “Save As”.
Teclas Alt + Print Screen
Another shortcut you can use to take a print on your computer is “Alt + Prt Sc”, so the print will be taken only from the active page, completely ignoring the Windows Taskbar that is positioned at the bottom of the screen. You can carry out the same process of pasting in an editing program and then saving the way you prefer, as described above.
Teclas Alt+D
If you want to start a windows screen recording or take screenshots with a delay of 1 to 5 seconds to perform some later action, then the perfect way to take a screenshot is with the “Alt + D” keys, since with it the print is not taken at the same time.
CTRL + P keys
If you want to take a print and then print the image, then the “CTRL + P” key will perform this process for you. The screen capture will automatically open on the page of the printing utility, and it is worth noting that the format will already be programmed so that, at the time of editing, there are no cuts in the image. After that, just click to print normally.
Learn more: How to make symbols on notebook keyboard?
Teclas Windows + Print Screen
By clicking the “Windows + Prt Sc” keys at the same time, the print will be automatically saved in your computer's images folder, so you don't need any editing program to save the screenshot. However, it is worth mentioning that you will not be able to rename the image or choose the location where it will be saved. As soon as you click on the keys, the screen will flash quickly, indicating that the process has been completed successfully.
Teclas Windows + Shift + S
If you only want to take a screenshot of a part of the screen, then the shortcut you are looking for is “Windows + Shift + S”. With this, you will notice that the screen will be slightly darker and at the top of the screen a small editing menu will open, where you will be able to define the type of print you want to capture, being able to cut where you want in the image. The image will be temporarily stored and will appear as a side notification in the Windows 10 operating system.
Windows Capture Tool
The Snipping Tool is a native Windows program that offers free screen cropping functions, the possibility to take a screenshot of just an open window and several other similar functions. To use the tool, just go to the start menu or click the Windows key, search by sliding the mouse or search for the name of the tool. After opening the capture tool, go to “Mode” and choose the region where you want the print to be executed.
The region options to run print are:
- Window Capture: only the screen of the program opened at print time will be saved;
- Rectangular Capture: all prints taken will only have a rectangular shape;
- Free Format Cutout: After the screenshot, the user can freely choose the image format;
- Full Screen Cutout: When taking the screenshot, the entire computer screen will be saved.
After setting the desired option for the print, a completely new window will open, where you can make more changes to the print, if you wish. After that, just save the file normally.
Xbox game bar
The Xbox Game Bar ended up becoming a native tool from Microsoft starting with the Windows 10 operating system. To use it, you don't need to have a gaming computer, let alone an Xbox console. Although it is much more used by users who usually play games on the computer, to record their games, for example. You can also use the Xbox Game Bar to learn how to take a screenshot on your laptop or computer.
The best part is that the system allows the user to upload the image directly to Twitter, clipboard or editing programs such as Paint. To use it, just click on “Windows + G”, with that a small menu will open on your screen, in the central part. Go to the camera button at the top left or click directly on “Windows + Alt + Prt Sc”, with that your print will be ready and just save normally.
Learn more: Degree symbol: how to put on Windows and Mac keyboard?