by Team AllYourVideogames | Mar 26, 2022 | Technology |
Pix transfers are becoming more and more common, mainly because the amount drops into the receiver's account within minutes. Today you will learn how to transfer via Pix Caixa and use this increasingly essential resource in our daily lives.
Since November 16, 2022, this functionality has been available, both for individuals and legal entities (companies) and, since then, banks have started to release the functionality in their applications for smartphones and internet banking on the computer.
Individuals using Pix do not pay any fees. Companies can be charged both when making and receiving transfers through Pix, whether transactions are carried out between companies or between a company and an individual.
Learn more: What is Pix, how it works and 5 benefits of using it today
How to transfer via Pix Caixa and transfer limits
Caixa Econômica Federal has set some limits for Pix transfers. Below, I list the limits for transfers through the app. To see the limits of internet banking and the Caixa Tem app, visit the Caixa website.
Limits for transfers through the Caixa app (no smartphone validity at the ATM)
- 06h01 out of 22h: R$ 5.000,00
- 22h01 out of 00h: R$ 3.500,00
- 00h01 out of 06h: R$ 1.500,00
Limits for transfers through the Caixa app (with smartphone validated at the ATM)
- 06h01 out of 22h: R$ 15.000,00 (individual) | BRL 25.000,00 (legal entity)
- 22h01 out of 00h: R$ 3.500,00
- 00h01 out of 06h: R$ 1.500,00
Now that you know a little more about how Pix works and how much you can transfer depending on the time, let's go step by step on how to transfer via Pix Caixa quickly, easily and safely.
Learn more: Pix Billing: how does it work and how to use it?
Step by step to transfer via Pix Caixa
Making a transfer through Pix Caixa is a very simple and easy task to do. Below you will have a step-by-step guide to help you make transfers via Pix without any doubts and difficulties.
Step 1: Accessing your account
Open the Caixa app on your smartphone and log in to access the features.
With the application open, locate the “Pix” option, as shown in the figure and click on this option.
A menu will open with some options and you must choose “Pay/Transfer”.
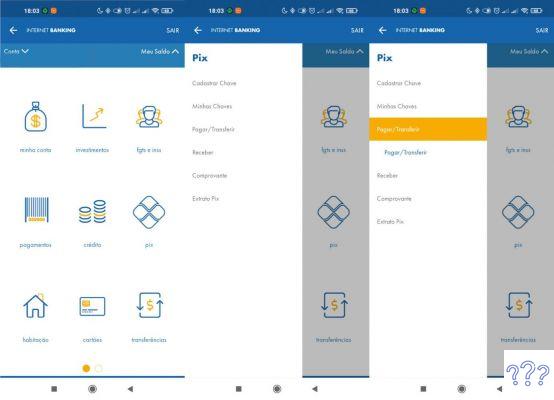
Steps to access the account and transfer page through Pix Caixa
Step 2: Informing the data of who will receive the transfer
After choosing the “Pay/Transfer” option, you must select the option according to the Pix information of the person who will receive the transfer.
- Key: you will use the Pix key (CPF, CNPJ, Cellular, Email, Random) of the transfer recipient
- Agency and account: you will inform the transfer recipient account details
- QR Code: you will read a QR Code that will automatically fill in the necessary fields for the transfer
- Pix Copy and Paste: you will be able to read the QR Code outside the Caixa app and copy the content, and then paste it in the indicated field
Once the option has been chosen, fill in the fields. If you choose the key, simply choose the type of key (CPF, CNPJ, Cellular, Email, Random) and type it in the respective field.
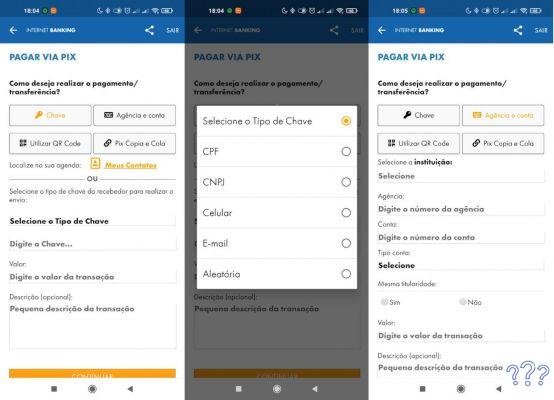
Screens with Pix usage options
The system will perform an automatic search and fill in the other fields with the receiver's information if the key entered is correct.
Next, you must inform the transfer amount and a description, which is optional and only serves to facilitate identification both on the receipt and on the statement.
With the fields duly filled in, click on “Continue” to proceed with the transfer.
At that moment you will be directed to a screen where you can check the receiver information and the amount to be transferred. If you need to correct something, click “Back”, otherwise click “Continue”.
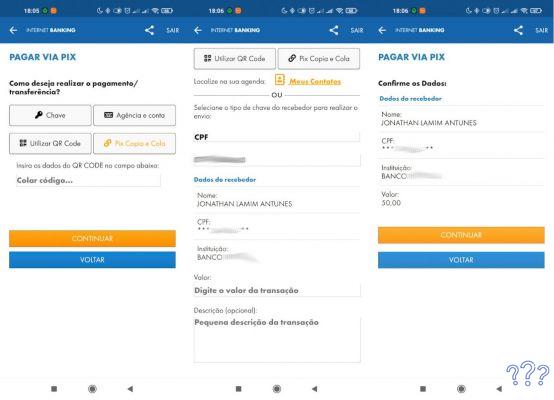
Screens with the filling of transfer data by Pix Caixa
Step 3: Completing the transfer through Pix Caixa
To complete the transfer, you must enter your electronic signature and then click on “Continue”.
At that moment, the Cashier system will process the transfer and you will have to wait a few seconds on a screen that will provide information on the processing status.
When it is completed, you will be directed to the screen with the transfer receipt, which you can share with the receiver, save to your smartphone or simply ignore and continue using the Caixa app for other operations.
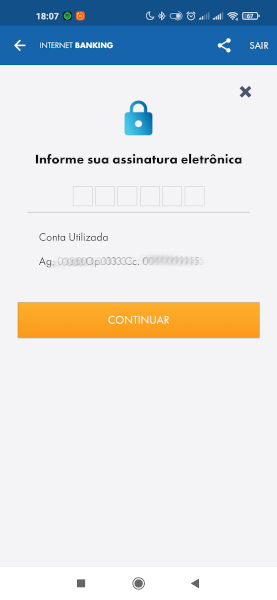
Screen to inform the electronic signature responsible for completing the transfer through Pix Caixa
Did you see how to transfer by Pix Caixa is easy?
In addition to being a very practical and safe procedure, the receiver will have the money in the account in a few minutes. If this step-by-step was useful to you, share it with other people you know and use the app and Pix Caixa.
Continue no blog
- How to generate a boleto at Nubank: 2 ways to charge
- How to recover Caixa Tem password?
- Earn cashback: what is it and 3 cash back programs